Spaghetti Carbonara was one of the first meals I made where I diverged from my mother’s recipe. Growing up, my mom would make a delicious Spaghetti Carbonara full of crispy bacon bits and sautéed onions covered in a creamy sauce. It was not until college that I realized that though bacon is passable, an authentic Spaghetti Carbonara recipe never includes onions and the creaminess does not come from some generous pours of heavy cream.
This summer Luke and I noticed a surge in galette popularity. Every food related Instagram account I follow posted at least one galette pic. Most posted two – a savory and a sweet. If anything, it’s a surprise galettes are not already more popular. Compared to a pie or tart, they’re way less intimidating and require no special equipment. No pie tin or tart ring necessary, all you need is a basic baking sheet. Galettes have a free form construction that allows for greater improvisation. They are also more forgiving. You don’t have to agonize over rolling the dough into a perfect circle. A little extra dough here and there can be easily remedied – just fold it over!
I learned something new while preparing to write this post. I learned that Jody Williams has another restaurant in the West Village. A restaurant that somehow I had never heard of (whaaaat). I knew about Buvette, which has previously inspired some home cooked meals, and Via Carota, her collaboration with Rita Sodi. Somehow I missed Gottino, the oldest of the bunch and quite possibly the most understated. It has a cute patio and a long spacious bar. It looks very appetizing compared to the squished “bistro” seating I’ve endured at Buvette, all for the sake of their delicious tartinettes.
There are few foods items I enjoy more than tartinettes (also known as crostinis) – a crusty piece of toast topped with a creative combination of cheese, meat, and/or vegetables. This walnut pesto is one such creation and comes originally from Gottino, but is now served at Buvette as well. Having it at Buvette for the first time, I knew I would love it forever. The rendition Luke and I make at home is very nearly as good. If I could I would eat this for dinner often – several large spoonfuls on crispy toasts with just a simple mixed green salad. Unfortunately, Luke doesn’t consider walnut pesto tartinettes substantial enough for dinner. I encourage you to enjoy walnut pesto for lunch, happy hour, dinner, maybe even breakfast. Our recipe comes from Deb Perelman. I also love this succinct recipe writeup from The New York Times in 2008, which omits ingredient measurements. Jody Williams has been serving walnut pesto for nearly ten years! That is the strongest endorsement of this recipe’s deliciousness.
Ingredients:
1 cup shelled walnuts (optional: toast and let cool)
1/4 cup grated parm
1 clove garlic, peeled and crushed or grated
fresh thyme (strip a few sprigs and give ’em rough chop)
salt, to taste
splash of red wine or sherry vinegar
1/3 cup olive oil
2 TBS minced sun dried tomato (oil packed or dry will work, if using oil packed can go a little lighter on the olive oil)
sliced baguette
Directions:
Using a mortar and pestle or food processor, grind walnuts, cheese, garlic, thyme, salt, and vinegar. Stir in olive oil and tomatoes.
Toast your baguette slices (cut fairly thin, 1/2 inch or so). Heap a generous spoonful of pesto onto your warm slices and enjoy immediately.
Pesto can be stored at room temp for up to a week.
Charlie Bird is one of those New York restaurants. It’s been around for over ten years!! That’s a feat in New York. And it still manages to have a newfangled feel. Lots of fresh ingredients, incredibly inventive dishes. The food is delicious. But…Charlie Bird is one of those New York restaurants – small plates, not so small prices. Luke and I have been only once and it was when my parents were in town. Special dinner for a special occasion. Our lives and salaries don’t really warrant dinners at Charlie Bird. Prior to our dinner, having done my research, I knew the farro salad was a Charlie Bird favorite. But sitting down for dinner and perusing the menu, there were so many other amazing options. Farro, being a humble grain, just wasn’t all that appealing! I don’t regret this decision. Dinner was perfect. And thanks to Melissa Clark, we were able to replicate the farro salad at home. Though we could never claim that our version is as good as Charlie Bird’s, we both were able to enjoy very sizable portions!
Ingredients:
1 cup farro
1 cup apple cider
2 tsp kosher salt + more to taste
2 cups water
2 bay leaves
6 TBS olive oil
juice of 1 small lemon (about 3 TBS)
about 1/3 cup shaved parm (you can use a vegetable peeler to shave)
2 big handfuls of arugula
1 cup parsley, roughly chopped
1 cup mint, roughly chopped
3 radishes, thinly sliced
3/4 cup cherry tomatoes, halved
Directions:
In a medium saucepan, bring farro, apple cider, water, salt and bay leaves to a simmer. Simmer until farro is tender (it will still have a little bit of chew) and the liquid has evaporated, about 30 minutes. If the liquid evaporates before the farro is done cooking, add a bit more water. Let farro cool and then discard the bay leaves.
In a salad bowl, make the dressing. Whisk together lemon juice, olive oil, and a pinch of salt. Add cooled farro and cheese and mix well. This mixture can sit for a couple of hours at room temperature, or overnight in the fridge. When ready to eat, mix in the arugula, herbs, tomatoes, and radishes. Top with flaky sea salt, to taste.
Details: Serves 4-6. This is a hearty salad and can be eaten as a main course! Serves 4 as a main, 6 as a side.
Disappointingly, women today are still not respected, nonetheless celebrated. In this month of March when we celebrate Women’s History, it is important to pay tribute to the incredible women who shape and inspire us. Women who deserve recognition everyday, but some extra pomp and circumstance all March long. Marcella Hazan is one of those women. When reading about Marcella you come across many admiring quotes – famous chefs and food writers who credit Marcella for teaching them how to cook, care for, and love food. Interestingly, many of the chefs Marcella inspired were men. Marcella did begin cooking for traditional reasons – married in 1955 and living in New York she was first compelled to cook in order to”feed a young, hard-working husband.” Although her foray into cooking was more or less due to gender stereotypes, she quickly realized her skillfulness and wasted no time putting it to good work. Hazan went on to publish several cookbooks. Her first, The Classic Italian Cookbook, is legitimately the classic Italian cookbook. It is canonical. This March, Luke and I honored Marcella’s legacy by tackling her bolognese recipe. We’d argue it’s the only bolognese recipe you’ll ever need. No need to cross reference with other cookbooks or websites, substitute one ingredient for another, or make many additions. Follow this recipe as is and you’ll have the perfect bolognese sauce.
1 1/2 cup canned whole tomatoes, cut up, with their juices (get good quality!)
1 lb pasta (spaghetti or fettuccine)
freshly grated parm, for serving
Directions:
Be prepared to spend the next 4 hours tending to your bolognese. Once it starts simmering it doesn’t take much work, but this sauce likes to be checked up on regularly.
Put the oil, butter, and chopped onion in a heavy bottom pot or dutch oven and turn heat on medium. Cook until the onion has become translucent, about 5 minutes, and then add the carrots and celery.* Cook for an additional 2 minutes.
Add ground beef, a large pinch of salt, and a few grindings of pepper. Stir meat well, so that it crumbles, breaking up with a fork if necessary. Cook until the beef has lost its red color.
Add milk and let it simmer gently, stirring frequently, until milk has bubbled away completely. Add the freshly grated nutmeg and stir.
Add the wine, and as with the milk, let it simmer until it has evaporated completely. Add the tomatoes and stir thoroughly to coat all the ingredients well. When the tomatoes begin to bubble turn the heat all the way down. You want the sauce to cook at a very gentle simmer. Cook, uncovered, for about 3 hours, stirring from time to time. During this cooking process, you will likely find that the sauce loses quite a bit of liquid. Be wary of this! You don’t want the meat to stick to the bottom of your pot so add 1/2 cup water at a time when the liquid supply is looking low.* At the end of the 3 hours though no water should be left. Also check taste as you go, adding more salt as necessary.
Add a tablespoon of butter to the cooked pasta, and toss with the sauce. Serve with plenty of freshly grated parm.
The recipe above is verbatim Marcella Hazan bolognese. We did not want to disrespect the queen of Italian cooking in this post. We did make the following 2 minor adjustments that you can consider making as well –
With the celery and carrots, we also added a couple cloves of garlic, minced.
We created a mixture of tomato paste and warm water (1 TBS tomato paste to 2 cups warm water), stirring the tomato paste into the water so that it would dissolve. We added this mixture to the sauce when it was drying out. We ended up using all 2 cups of this mixture during the 3 hour simmer.
It is finally officially summer! The farmers’ market is overflowing with luscious fruits and vegetables begging to be turned into a delicious seasonal feast. And there is no more archetypal summer meal than soup.Oh-kaaaay…so that’s a completely sarcastic statement, but Luke and I both feel this soup deserves serious summer status! 1) It requires no oven use whatsoever 2) It includes many of summer’s best bounty aaand 3) This soup manages to be light and healthy (entirely veggie!!) but also extremely flavorful and nuanced (especially when parm broth is used). Luke and I strongly advise that you blast “Summer Sixteen” while chopping up all of these veggies. Making this delicious soup is an ideal way to celebrate summer.
This recipe is adapted from Mimi Thorisson’s soupe au pistou, which can be found in her cookbook A Kitchen in France.
Ingredients – Soup:
3 TBS olive oil
2 onions, thinly sliced
2-3 medium carrots, minced
1 leek, white and light green parts, thinly sliced
2 zucchini, minced
8 oz green beans, cut in half lengthwise
4-5 tomatoes, peeled, deseeded, and chopped (or 1 15-oz can chopped tomatoes, with juices partially drained)
5 cloves garlic, thinly sliced
1 bunch basil, roughly chopped
1 TBS herbs de provence
salt & pepper, to taste
1 bay leaf
5-6 cups water or preferred broth (chicken, vegetable, parm)
8 oz kidney beans (pre-soaked or from a can)
8 oz white beans (pre-soaked or from a can)
1 cup elbow macaroni
Luke and I topped our bowls with a simple mix of basil, garlic, olive oil, and a touch of salt, mashed with a mortal & pestle:
2 garlic cloves, minced
handful of basil leaves, finely chopped
1 TBS olive oil
pinch of salt
Directions:
In a large pot, heat olive oil over medium heat. Add the onions, carrots, leek, zucchini, green beans, tomatoes, and garlic. Saute for 5-8 minutes, stirring to make sure the vegetables cook evenly. Add the basil, herbs de provence, and salt and pepper. Saute for 2 minutes more.
Add your chosen liquid and bring to a boil. Once boiling, simmer for 15-20 minutes, uncovered.
Add the uncooked macaroni and cook until al dente, 8-10 minutes, and then stir in the beans.
Serve immediately! If you like, top with basil mix and shaved parm.
The impetus for concocting this recipe was an Instagram post, and if I remember correctly, it was post by Bon Appétit. Upon seeing the photo in my feed, I immediately thought to myself “YES, what a great way to use all those leftover Parmesan rinds Luke and I are always having to throw away.” Ingenious cooking for the WIN. I saw this post back in January, during the height of soup making season, and have been saving Parmesan rinds in our freezer since then. So finally last weekend, before we head into consistently nice Springtime weather, Luke and I spent our Sunday afternoon simmering some Parm broth. It perfumed our lil’ apartment with a cheesy fragrance…mmmmm. The result: a rich and versatile broth that can be used to enhance flavor in soup, pasta, and bean dishes.
Ingredients:
2 TBS olive oil
1 onion, peeled and quartered
1 head garlic, halved crosswise
1 bunch thyme
3-5 parsley sprigs
1 tsp black peppercorns
1 cup dry white wine
1 lb Parmesan rinds (we used around 10 rinds of varying sizes)
Directions:
In a large pot or dutch oven heat the oil over medium-high heat. Cook onion, garlic, thyme, parsley, and peppercorns, stirring often, until garlic has browned, about 5 minutes. Add wine and bring to a simmer. Cook until the liquid is reduced by half, about 4 minutes, scraping up any brown bits.
Add 8 cups water and Parmesan rinds. Bring to a boil and the reduce heat and simmer for about 2 hours. You will have to stir occasionally to prevent cheese from sticking to the bottom of your pot.
After 2 hours, strain your broth through a fine-mesh sieve (we used a colander and cheese cloth) into a large bowl.
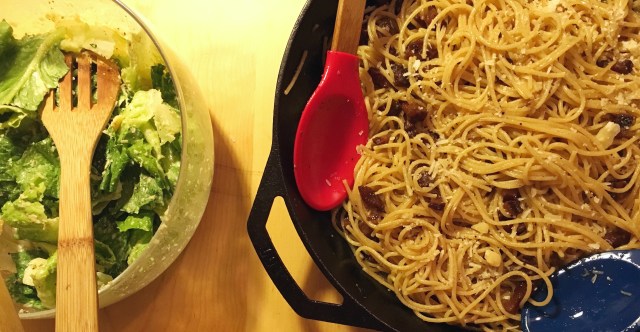
Like most, we are big fans of bacon and pasta, respectively and combined. Two of our favorite dishes come from Cal Peternell’s Twelve Recipes. His carbonara and amatriciana recipes are always smashing successes. Admittedly, we typically opt for regular old grocery store bacon instead of pancetta or the even more authentic option of guanciale. Feeling a bit adventurous, but also wanting to keep it simple for our Saturday night dinner, we decided to try Mark Bittman’s version of a Roman classic, pasta alla Gricia. Marky B stresses the importance of using guanciale, so we finally committed, trekking into Manhattan to buy a nice hunk of pig jowl at Eataly (we’ll visit our favorite butcher Los Paisano’s in Cobble Hill next time). The guanciale elevated this pasta from a simple weekday dinner to a delicious Saturday night feast. And now we feel like slightly more legit gourmands.
Ingredients:
1/2 pound guanciale (cured pig jowl), cut into 1/4 inch pieces*
1/2 tsp freshly ground black pepper + more to taste
3/4 pound spaghetti or other long pasta
1/2 cup freshly grated pecorino romano or parmesan
Directions:
Cook the guanciale in a large skillet over medium heat until deeply golden. You may need to adjust the heat to not cook too quickly. You want the fat to render without burning the meat. The meaty parts should be brown and the fatty parts should be cooked but still slightly transparent. This should take 10-15 minutes. When done, add the black pepper and turn off heat.
While cooking the guanciale, bring a large pot of salted water to a boil. When the water reaches a boil, add the the pasta. Cook till al dente and drain, reserving 1 1/2 cups of pasta water.
You want the pasta to still be wet and hot, so while it is cooking add 3/4 cup of the pasta water to the cooled guanciale. Turn heat to high and reduce liquid by half.
Once reduced, transfer pasta to the skillet. Mix vigorously and stir in more pasta water if necessary to create a creamy sauce. Add the cheese and extra cracked pepper.
Garnish with additional cheese! Enjoy with a glass of red wine.
Details: Serves 4
*Note 1: If you can’t find gaunciale, pancetta or bacon will also work. But guanciale is a game changer in this recipe!!
A photo of this recipe graces the back cover of Ottolenghi’s Plenty More. Conclusively, it must be one of the cookbook’s greatest hits. It is certainly one of the most photogenic. With its’ complementary color schema, poppin’ purple onion rings, herb freckled surface, it’s nearly modelesque. Instagram undoubtedly crosses one’s mind when admiring this cake. And, as it turns out, of the recipes in Ottolenghi’s all veggie Plenty More this cauliflower cake is a unique, flavorful, and versatile option. Looks good and tastes good too! It is spongey from the eggs, but not at all similar to a quiche or frittata. The rosemary and parmesan add a savoriness which is balanced with a little sweetness from the fresh basil. And the cauliflower creates a wonderful texture and density.
This cake can serve as the main dish of any meal. We enjoyed a slice for dinner with a green salad and some cheese. And to avoid any stressing as Ottolenghi recipes often have a difficult twist, we simplified this recipe a little bit. You can find the original on The Kitchn.
Ingredients:
1 small cauliflower, leaves removed, broken in to 1 1/4 inch florets (about 4 cups)
1 medium red onion, peeled
5 TBS olive oil
1 tsp finely chopped rosemary
7 large eggs
1/2 cup fresh basil, chopped
1 cup flour
1 1/2 tsp baking powder
1/3 tsp turmeric
1 1/2 cups fresh grated parmesan
salt & pepper ~ to taste
Directions:
Preheat oven to 400°F.
Place cauliflower florets in a medium saucepan, cover with water, and add 1 tsp salt. Bring water to a boil and then simmer for about 15 minutes, until florets are soft. You’ll want the florets to break when pressed with a spoon. Drain and set aside in a colander to dry.
Cut about 1/3 of the red onion into thin round slices, each 1/4 inch thick and set aside. Coarsely chop the remainder of the onion and place it in a small pan with 5 TBS oil and rosemary. Cook for ten minutes over medium heat until soft, stirring to ensure onions don’t stick or burn. Remove from heat and set aside to cool.
Once cool, transfer onion to a large bowl. Add the eggs and basil, whisk well, and then add flour, baking soda, turmeric, parm, 1 tsp salt, and plenty of freshly ground pepper. Whisk until smooth, but be mindful. This cake does not need lots of whisking. Add cauliflower, incorporating into the batter with a wooden spoon. Try not to break up florets too much, unless you have some larger guys like we did. You don’t want cauliflower popping out too much from your cake batter.
Line the base and sides of a 9 1/2 inch springform cake pan with parchment paper. Or, if you don’t have a springform pan, use a 9 inch round cake pan instead, lined with parchment paper. Make sure paper comes up the sides to easily remove the cake. Pour the cauliflower mixture into the pan, spreading it evenly, and arrange reserved onion rings on top. Place in the center of the oven and bake for 45 minutes, until golden brown and set. A knife inserted into the center of the cake should come out clean.
Remove from oven and let sit for 15-20 minutes before serving. Serve just warm.
Details: Serves 4 to 6. Perfect for morning after leftovers.
Two weeks ago, when Winter Storm Jonas wreaked snowy havoc on New York, Luke and I ventured into the frozen tundra. Trekking in our not so appropriate snow gear through the streets of Brooklyn, we worked up a serious appetite. Our chilled limbs craved a warm, comforting meal. Something that required simmering, included carbs, and plenty of cheese. Pasta was the obvious answer. But we wanted something special to mark this momentous weather occasion. This ragù, adapted from the always trustworthy NYT, perfectly fit our needs. It is the ultimate Saturday night let’s just chill inside and watch a movie meal. And though your plans may be low-key, prepare to be mind-blown by this ragù. That is not hyperbole!! It is ideal for dinner, lunch leftovers, or at around 3am, after you’ve had too much red wine and find yourself in a drunken, hungry stupor.
Ingredients:
1 lb spicy Italian sausage
Extra virgin olive oil
1 large onion, minced
2-3 medium sized carrots, peeled and minced
3 celery stalks, minced
1/3 cup parsley, minced + extra for garnish
3 cloves garlic, minced
1 28-ounce can whole tomatoes (San Marzano are best!) + juice
1 tsp thyme
2 tsp oregano
3 TBS tomato paste + 1 cup hot water
salt & pepper
1 lb tubular pasta – rigatoni, penne, cavatappi, etc.
plenty of fresh grated parm!
Directions:
With the tip of your knife, slit open sausage casings. Crumble meat into a heavy pot or skillet (Dutch oven, cast iron pan both work very well) and set over medium-low heat. If the meat is not rendering enough fat to coat the bottom of the pan, add some olive oil. Saute, breaking up any large chunks, until the meat has turned opaque (not yet brown!). Should take about 5 minutes.
Add the onion, carrots, celery, parsley, and garlic and stir. Drizzle some more oil if the pan seems dry. Cook over very low heat, stirring often, until the vegetables have begun to caramelize in the fat and the meat is a nice deep brown. This could take up to 40 minutes! Just stir occasionally, make sure nothing is sticking to the pan, and let the flavors develop. You will taste the difference!
Add tomatoes and their juices. Break up the tomatoes by squeezing them into the pan with your hands or crushing with a spoon. Raise heat to medium-high and bring to a simmer. Once simmering, lower heat and add thyme and oregano. Simmer, uncovered, until thickened and pan is almost dry, about 20-25 minutes.
About midway through this simmer, bring a large pot of salted water to a boil for your pasta. Boil pasta until al dente.
At the end of the simmering, mix tomato paste in 1 cup hot water. Add to pan and reduce heat to very low. Cook for about ten minutes more.
Ideally, your pasta is finished right around the same time as your ragù! If sauce seems thick, you can add in a little pasta water. You can mix the hot pasta directly with the ragù or plate individually (we prefer the latter, allows everyone to decide on their pasta to ragù ratio). Serve with lots of freshly grated parm and some parsley!
Details: Serves about 4. You’re gonna want a big portion.