For Thanksgiving this year I did not make Apple Pie. I’ve never been the biggest fan of Apple Pie. I’m actually not the biggest fan of making any kind of pie that requires two crusts (a top and a bottom). Though I consider myself a pretty adept crust maker, it’s still a laborious and nerve inducing process. I especially dread rolling out the dough and then transferring it to the pie tin. While I roll, Luke watches carefully and provides words of encouragement. Together, we flip the crust a couple times, re-flouring the surface between flips, to avoid sticking. We roll the dough up onto the rolling pin at the end to transfer it to the pie tin. We patch up the sides; the crust is never perfect. It’s always a relief when it’s in the tin. Having to do the process all over again with the top…oof.
Spaghetti Carbonara was one of the first meals I made where I diverged from my mother’s recipe. Growing up, my mom would make a delicious Spaghetti Carbonara full of crispy bacon bits and sautéed onions covered in a creamy sauce. It was not until college that I realized that though bacon is passable, an authentic Spaghetti Carbonara recipe never includes onions and the creaminess does not come from some generous pours of heavy cream.
“I’m pretty upset that today was the first time I’ve had a proper Maine lobster.” This was the text I sent my parents after lunch in Kennebunkport, ME two weekends ago. Yes I know, #firstworldproblems indeed. But I was drunk off of sweet corn, clam chowder, and freshly-caught lobster, so I felt some guilt tripping was warranted.
Dijon mustard is one of the most versatile ingredients in your fridge. Sadly, the small Maille or Grey Poupon jar often sits in condiment asylum with months-old bottles of ketchup, mayonnaise, and salsa. It’s time to break your mustard loose from hot dog hell. The world of marinades, dressings, glazes, slaws, and sauces awaits! A grainy Dijon mustard plays a starring role in this roasted pork loin recipe. Used along with brown sugar and herbs, the mustard glaze gives the meat amazing flavor and texture. To double-down on the Dijon, make a quick side salad of arugula dressed with a mustard vinaigrette. Previously unused and unappreciated, your jar of Dijon will definitely be feeling itself after this meal.
This marinade comes from Marian Burros of the NYT. The overnight marinating is not mandatory but definitely recommended. We opted for pork loin instead of pork tenderloin, as called for in the original recipe, and modified the cooking time. But this works really well for pork tenderloin too! And if you’re curious about the difference, read more here.
Ingredients:
2 lb pork loin
3 TBS brown sugar
2 TBS grainy Dijon mustard (if you don’t have grainy Dijon, smooth Dijon will suffice, you’ll just lose some of the texture)
2 tsp rosemary and/or thyme, chopped
2 cloves garlic, minced
2 TBS cooking sherry or red wine vinegar
Directions:
Make the marinade. In a small mixing bowl, combine brown sugar, mustard, rosemary, thyme, garlic, and sherry/vinegar.
Place pork loin in a plastic bag or shallow bowl. Pour the marinade over the meat and turn to coat well. Let the pork loin marinate in the fridge overnight. If you’re pressed for time, you can marinate for as little as 30 minutes.
Preheat oven to 400°F. Line a medium-sized baking sheet with foil. Place the loin fat side down unto the baking sheet. This can also be done in a well oiled cast-iron skillet.
Roast for 25 minutes. The fat side will have developed a nice crust. Turn fat side up and roast for another 25 to 30 minutes. To test doneness, you can insert a thermometer into the center of the loin. The internal temperature should read 155°F.
Remove from oven and let loin sit for 10 minutes. Cut crosswise into thin slices.
A simple pan-sauce can be made by deglazing the meat juices in a skillet or saucepan. Luke’s special recommendation: use leftover meat to make a classic roast pork sandwich the next day.
Details: Serves 4 or 2 for dinner plus 2 for lunch sandwich leftovers.
This recipe, which we sourced from Nigella Lawson, has made its way around the web a bit. You can find a version from Deb Perelman of Smitten Kitchen. Martha makes a similar recipe with just two additional ingredients – lemon zest and fresh dill. It’s a tried and true recipe that is welcome to a little tinkering. And like Romeo and Juliet or Jay-Z and Beyonce, buttermilk and chicken are an illustrious couple, most famous of course for the wondrous results of frying buttermilk brined chicken. Buttermilk is such an amazing marinade because it not only imbues flavor, but its acidic composition also tenderizes the meat – double win!! As long as you can remember to whip together this super simple marinade the night before, this chicken recipe comes together real quick and yields flavorful, tender meat with salty, crispy skin. Enjoy with a green salad and some bread to sop up the chicken juices. You’ll feel like you’re seriously spoiling yourself for a weekday dinner.
Ingredients:
4-6 chicken bone-in thighs (or a mix of thighs, drumsticks, wings – important to have bone-in chicken, whatever you choose!)
2 cups buttermilk
1/4 cup + 2 TBS veggie oil (we used canola)
1 TBS freshly ground black pepper
1 TBS sea salt
2 TBS freshly chopped rosemary
1 TBS honey
2 cloves peeled and crushed garlic + garlic cloves with skin on for roasting (optional)
Directions:
The night before, marinate yo chicken! Place chicken in a large freezer bag. Add buttermilk, 1/4 cup oil, salt, crushed garlic, rosemary, and honey. Seal bag securely, mix contents around, and store in your fridge. Chicken can be marinated for up to 2 days.
Remove chicken from marinade and place on rack so excess can drip off. Try to let your chicken rest at room temperature for 30 minutes, or an hour ideally. This will allow your chicken to dry off a bit and come to room temperature, which ensures even cooking and crispiness.
Preheat oven to 425°F. We opted to cook our chicken in our cast iron skillet, but you can also cook on a tinfoil lined roasting pan (tinfoil makes for easy cleanup). Drizzle chicken with 2 TBS of oil. Sprinkle with a bit more sea salt and freshly cracked pepper. Throw the couple cloves of garlic in the skillet as well, if you’d like (they turn soft and are great spread over a slice of bread). Place in oven and cook for 20-25 minutes, or until when chicken is pierced the juices run clear.
Remove from oven and let rest for about 5 minutes. Then enjoy immediately!
Details: Serves 4-ish. Maybe we’re gluttons, but we have a hard time eating just a single chicken thigh per person.
Disappointingly, women today are still not respected, nonetheless celebrated. In this month of March when we celebrate Women’s History, it is important to pay tribute to the incredible women who shape and inspire us. Women who deserve recognition everyday, but some extra pomp and circumstance all March long. Marcella Hazan is one of those women. When reading about Marcella you come across many admiring quotes – famous chefs and food writers who credit Marcella for teaching them how to cook, care for, and love food. Interestingly, many of the chefs Marcella inspired were men. Marcella did begin cooking for traditional reasons – married in 1955 and living in New York she was first compelled to cook in order to”feed a young, hard-working husband.” Although her foray into cooking was more or less due to gender stereotypes, she quickly realized her skillfulness and wasted no time putting it to good work. Hazan went on to publish several cookbooks. Her first, The Classic Italian Cookbook, is legitimately the classic Italian cookbook. It is canonical. This March, Luke and I honored Marcella’s legacy by tackling her bolognese recipe. We’d argue it’s the only bolognese recipe you’ll ever need. No need to cross reference with other cookbooks or websites, substitute one ingredient for another, or make many additions. Follow this recipe as is and you’ll have the perfect bolognese sauce.
1 1/2 cup canned whole tomatoes, cut up, with their juices (get good quality!)
1 lb pasta (spaghetti or fettuccine)
freshly grated parm, for serving
Directions:
Be prepared to spend the next 4 hours tending to your bolognese. Once it starts simmering it doesn’t take much work, but this sauce likes to be checked up on regularly.
Put the oil, butter, and chopped onion in a heavy bottom pot or dutch oven and turn heat on medium. Cook until the onion has become translucent, about 5 minutes, and then add the carrots and celery.* Cook for an additional 2 minutes.
Add ground beef, a large pinch of salt, and a few grindings of pepper. Stir meat well, so that it crumbles, breaking up with a fork if necessary. Cook until the beef has lost its red color.
Add milk and let it simmer gently, stirring frequently, until milk has bubbled away completely. Add the freshly grated nutmeg and stir.
Add the wine, and as with the milk, let it simmer until it has evaporated completely. Add the tomatoes and stir thoroughly to coat all the ingredients well. When the tomatoes begin to bubble turn the heat all the way down. You want the sauce to cook at a very gentle simmer. Cook, uncovered, for about 3 hours, stirring from time to time. During this cooking process, you will likely find that the sauce loses quite a bit of liquid. Be wary of this! You don’t want the meat to stick to the bottom of your pot so add 1/2 cup water at a time when the liquid supply is looking low.* At the end of the 3 hours though no water should be left. Also check taste as you go, adding more salt as necessary.
Add a tablespoon of butter to the cooked pasta, and toss with the sauce. Serve with plenty of freshly grated parm.
The recipe above is verbatim Marcella Hazan bolognese. We did not want to disrespect the queen of Italian cooking in this post. We did make the following 2 minor adjustments that you can consider making as well –
With the celery and carrots, we also added a couple cloves of garlic, minced.
We created a mixture of tomato paste and warm water (1 TBS tomato paste to 2 cups warm water), stirring the tomato paste into the water so that it would dissolve. We added this mixture to the sauce when it was drying out. We ended up using all 2 cups of this mixture during the 3 hour simmer.
The Mimi of this wonton soup recipe is Mimi Thorisson. Her food blog Manger and two cookbooks are portrayals of idyllic life – lots of beautiful, fresh food, adorable children, even cuter dogs, and a photographer husband, capturing every single moment perfectly. It is almost suspiciously serene. But while her pictures evoke envy and a bit of skepticism, we do love to look at and cook her food.
Luke and I celebrated New Year’s Eve separately, he in Philadelphia with friends and me alone on a plane. To make up for missing each other on December 31, this past weekend we made a special meal for Chinese New Year (新年快乐!). Admittedly, this soup is so easy to make it may not warrant being called “special.” But the wontons do possess a certain je ne sai quoi. With a scattering of scallions and a swirl of sesame oil, these brainy wontons are subtlety elegant and delicious.
We enjoyed our bowls of soup reflecting on the past year and hoping that in 2017, amidst these already troubled times, we can do more good and experience more good than in 2016.
Ingredients:
1/2 – 3/4 pound peeled shrimp, coarsely chopped
1/2 – 3/4 pound ground pork (not too lean)
1 egg white
1 TBS soy sauce
1/2 TBS oyster sauce
1/2 TBS rice wine
1/2 tsp sesame oil (plus more for serving)
1 TBS grated fresh ginger
pinch of sugar
1/2 tsp salt
1/2 tsp pepper
pack of square wonton wrappers
2 quarts chicken stock
chives, scallions, cilantro (freshly chopped) for garnish
Directions:
Begin by making the wonton filling. Mix the shrimp and pork in a medium sized bowl. Add the egg white, soy sauce, oyster sauce, rice wine, sesame oil, ginger, sugar, salt, and pepper and mix well. Set the filling aside for 20 minutes.
Lay out a large piece of parchment paper and sprinkle with flour. Take your pile of wonton wrappers, one at a time, covering the pile with a damp towel so that they do not dry out. Add a little over 1 tsp of filling to the center of a wrapper. Wet the edges of the wrapper with water (we set out a little bowl of water and wet with our fingers) and fold in half to make a triangle, pressing down firmly. Make sure the seal is secure, you do not want any little gaps. Then, gather the 2 opposite corners of the wrapper, dot them with water, and join them together. Again, press firmly to seal. Set wrapped wonton on a lightly floured baking sheet. Repeat with the remaining wrappers and filing, until you have about 25-30 wontons. You will likely have leftover filing and definitely leftover wrappers. The filing keeps for 2-3 days so more wontons can be made later.
Bring the chicken stock to a boil in a large soup pot over medium heat. Season with a bit of salt and pepper, to taste. While doing this, bring a large pot of water to a boil. Once boiling, add the wontons and cook in batches (roughly 12 at a time). The wontons are finished when the rise to the top, about 5 to 8 minutes. Transfer to a plate as they are cooked.
Add the cooked wontons to the chicken stock and bring back to a gentle boil. To serve, ladle about 6 wontons into a bowl and top with some chicken stock. Sprinkle with chives, scallions, and/or cilantro and a few drops of sesame oil. Serve with chili oil on the side, if desired.
As if New York in January isn’t dreary enough, we now have Trump’s inauguration looming. Friday, January 20th. How did this date come so quickly? Back in November, I attempted to write an election related post. The draft begins, predictably, with a rehashing of my 24-hour emotional journey, from the morning of November 8 to the morning of November 9. There’s some political correctness. I avoid outrightly bashing Trump supporters and admit to living in a liberal enclave. And then there’s a recount of the meals I ate in the days following. They’re decadent, definitely self-indulgent and all international in origin:
On Thursday, Luke and I had ramen topped with a thick slab of pork belly and a perfectly poached egg, all swimming in a rich, miso spiked broth. Friday night, I ordered in. Chicken tikka masala and samosas, India’s ultimate comfort food. There were no leftovers. And on Saturday, I enjoyed a slightly more than I can afford Italian dinner, complete with a few glasses of Tuscan wine.
On Sunday, Luke and I agreed we had to return to cooking.
For dinner we made Craig Claiborne’s Smothered Chicken. Americana comfort food at its finest, it was a reminder of our country’s wonderful unconventionality. Craig Claiborne, a child of Mississippi, grows up and becomes the preeminent food editor of his time for the most sophisticated U.S. publication, The New York Times. He’s credited with broadening Americans’ food horizons, but he still had a deep appreciation for classic American home-cooked food. Easy, delicious, heartwarming – we finished this meal feeling a little lighter. Not necessarily in calories, but certainly in spirit. Our country no longer felt like such a foreign place.
Remembering this dinner and these days, I’m still wondering how I can do more. And what could that “more” mean? In a muddled way, I’ve thought about “more” a lot and have ended up not doing much at all. Perhaps the answer is to think less and simply act more. Not necessarily through a grand initiative, that takes a lot of toiling to think up, but with positive, incremental actions each day. Make an effort to be consistently informed and accountable. Make an effort to think constructively and avoid defaulting into a pessimistic mindset. Make an effort to be open, to question, to listen. Make an effort to understand. This election, for me, has been a reminder of some personal complacency. And in these next four years I don’t want to be comfortable. So while I may be enjoying comfort food, I’m making it my personal mission to avoid a metaphorical food coma.
Ingredients:
1 whole chicken (the smaller the better), spatchcocked
salt & freshly ground pepper, to taste
2 TBS unsalted butter
2 TBS all-purpose flour
1 1/2 cups chicken broth
Directions:
We maybe should’ve started this post with a disclaimer…Craig Claiborne insisted that a cast iron pan be usedfor this recipe. But, we won’t discourage you from trying it out with a large skillet! Start by making sure the chicken is at room temperature and thoroughly dried off. If your chicken has been in the fridge, season with salt and pepper, and then let it rest on your counter for 30 minutes before preparing. After 30 minutes, pat the chicken dry with paper towels.
Melt the butter in your cast-iron skillet. Add chicken, skin side/breast side down. Fold the wings under the breasts to secure. Cover the chicken with a plate and the on top of the plate place a brick or 2-3 heavy cans – something heavy to weigh the plate down. You want good contact between the chicken and the skillet. Cook over low heat undisturbed until skin is nicely browned, about 25 minutes.
Once browned, remove the weight and plate. Turn the chicken so the skin side is up. Replace the plate and weight and continue cooking for 15 minutes more.
Remove the chicken and pour off fat from the skillet, leaving about 2 TBS in the pan. Add the flour to the fat and stir with a metal whisk over medium heat. Then gradually add chicken broth. When thickened, return chicken to the skillet, skin side up. Add salt and pepper to taste. Cover with plate and weight and continue cooking for 20-30 minutes, until the meat is exceptionally tender. Finish by spooning the sauce on top.
Cut into serving pieces and enjoy immediately! We served with mashed potatoes, though rice, biscuits, or crunchy bread would also be tasty. Anything to sop up the gravy!
This chicken soup recipe is very apropos. Why? We’ve got three compelling reasons. Reason one, winter is here, aka cold season. Maybe you’ve got some sniffles already. Or feel the flu coming on. Chicken soup is the OG penicillin. Reason two, it’s the New Year and you’ve made some New Year’s resolutions. Like cook more. Or, stop eating so much processed garbage. Put this homemade goodness in your body and you’re satisfying both of those resolutions. Reason three, it’s January, the drabbest month of the year, and all you want to do is sit in front of your SAD lamp. Make this chicken soup this weekend and you’ll have an excellent reason to sit on your couch and watch Netflix all day. Tell your friends you have amazing, homemade chicken broth simmering on the stove and can’t leave your house. Foolproof excuse.
This homemade chicken soup fulfills all your current life requirements. And it’s delicious! Julia Moskin provides the original recipe (with a beautiful video), which we did some slight tweaking too. Enjoy!
Ingredients for broth:
1 chicken, 3 to 3 1/2 lbs (or the smallest you can find in your supermarket) with skin on, cut up into 8 pieces
3 celery stalks, cut into chunks
2 carrots, peeled and cut into chunks
1 onion, quartered
1 parsnip, peeled and cut into chunks (optional)
handful of parsley springs
10 or so black peppercorns
2 bay leaves
2 tsp kosher salt
Ingredients for soup:
reserved chicken fat (up to 3 TBS)
2-3 leeks, rinsed, trimmed, halved lengthwise, and sliced into thin half-moons
2 shallots sliced thinly
2-3 celery stalks, diced
2-3 carrots, peeled and diced
1-2 TBS freshly chopped herbs (parsley, tarragon, thyme, dill all work wonderfully)
kosher salt and freshly ground black pepper, to taste
Making the broth is easy, just start a day in advance. Place cut up chicken (here’s a how-to), vegetables, salt, peppercorns, and bay leaves in a large soup pot. Cover with cold water by 1 inch.
Bring to a boil over high heat. Once boiling, turn heat all the way down. You want hardly any bubbling. Cook uncovered for 1 1/2 hours. Alternatively, you could turn the heat all the way off, cover, and let the chicken sit in the warm pot all morning and/or afternoon.
Once the broth has cooled down, remove the chicken and place in a separate container. Notch up the heat just a little bit and let the broth simmer. You want it to get concentrated and flavorful. An additional hour should suffice. Just don’t let all your broth cook off! Then strain your broth through a fine sieve (colander lined with cheese cloth also works well). Discard solids.
Refrigerate chicken and broth separately for at least 8 hours (up to 3 days) until a layer of yellow fat has risen to the top of the broth. Once ready, skim the fat and set aside. You can also now shred the chicken into bite size chunks. Shredding the 2 breasts should yield enough chicken pieces. You can reserve the dark meat for something else.
You are now ready to make the soup. Place 3 TBS of chicken fat (+butter, if necessary) into a soup pot. Add leeks and shallots and cook over medium heat until leeks begin to fry and shallots are translucent and soft.
Reduce heat and add celery, carrots, and a heaping TBS of herbs. Sprinkle with salt. Cover pot and cook until vegetables are tender, about 5 minutes. Don’t brown! And don’t worry. They will cook more in the broth.
Add broth to the pot and heat to a simmer. Add noodles and continue simmering until noodles are cooked through. Add the chicken chunks and salt and pepper, to taste.
Serve with a sprinkling of freshly chopped herbs on top.
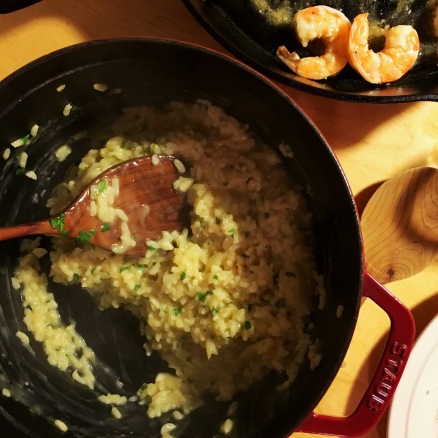
Risotto is one of those recipes that elicits respect. It takes a little bit of TLC, all of that stirring. Risotto is needy. You can’t leave it unattended too long. And it is key to be patient when adding the stock. Too much liquid at one time can completely derail the dish. So be prepared to stand over your saucepan and enjoy the cooking magic of this ever absorbing rice. But, all in all, it is a fairly easy dish to whip together and can definitely be concocted in under one hour. Skip shrimp to make it even simpler! The risotto is delicious enough to stand on its own and will still impress.
Shell and de-vein the shrimp. Set aside and salt them lightly. Rinse the shells and combine with 4-5 cups water. Bring to a boil, skim off the foam, reduce heat to low and simmer partly covered for 30 minutes. Strain and add to chicken stock. Bring the stock to a simmer in a saucepan.*
Melt the butter in a large, wide saucepan and then add the shallots. Cook, stirring until the shallot softens, 3-5 minutes. Add a pinch of salt to the shallots and stir, and then add the rice and garlic. Cook, stirring, until the rice begins to crackle.
Stir in the wine and cook over medium heat. You want the wine to bubble, but not too quickly. When the wine has just about evaporated, add a ladleful of the stock, enough to cover the rice. Stir often over medium-low heat. As the rice absorbs the stock, add additional ladlefuls. You want to add more stock once the previous ladleful has just about been absorbed. At some point, crush the saffron threads between your fingers and stir in. You should continue adding stock for about 20 minutes.
After 20 minutes, taste a bit of rice. The rice should be a bit chewy, but definitely not hard in the middle. Continue adding stock until you reach this al dente stage (you likely will have a bit of leftover stock). When you think your rice is nearly perfect, stir in parsley and one more ladle of stock. Remove from heat, season with salt and pepper.
We like to make the shrimp separately, but you can also add to the rice to cook. If cooking with the rice, when the rice is nearly finished, add the shrimp to the risotto with a ladle of stock and cook, stirring for 4-5 minutes, until the shrimp is pink. If you’d like to cook separately, heat 2 TBS of olive oil over medium-high heat in a pan. Add shrimp in an even layer and cook for 3 minutes. Turn shrimp and cook an additional 2 minutes. We recommend adding a spritz of lemon, splash of white wine when turning the shrimp.
Details: Serves 4
*Note: You can skip the shrimp and just purchase a bit more chicken stock. In this case, you’d be making delicious, classic risotto without the extra fuss of creating shrimp stock.